Friday, December 17, 2010

The Halloween Rag Quilt

Here it is folks, the quilt that almost killed me.
It's a Halloween rag quilt for our Church's blanket trick or treating, of course!

8ft by 6ft
96 individually quilted and ragged blocks.

I used a different quilting technique for each block color.
Some have words or pictures. Some are just lines and swirls.


For this rag quilt I cut all of the squares out of the top fabric and also the back fabric (which was black).

I also cut the batting into squares an inch smaller than the fabric.

After making my block sandwiches with back fabric, batting, and top fabric, I quilted each block. I just used my regular sewing machine to do this. I drew designs onto the fabric with a disappearing marking pen and then "traced" them with my sewing machine. It was time consuming, but it wasn't difficult.

When all of the blocks were quilted, I sewed them together with wrong sides together. This puts the seams facing the top of the quilt.

After putting together all of the blocks, sit down, put on a movie and get comfy. Then start snipping! Wash the blanket and enjoy!

Toys for Boys

Here's an oldie that I haven't shared yet.

It's a toy car mat that folds up for easy transport to and from church or wherever.
The mat is just simply two pieces of fabric sewn together with the road sewn out of felt onto one of the fabrics. I put plastic canvas in between for stability, but if I did this again, I would just use some batting. Or maybe both the batting and plastic canvas.
When it is folded up there is a pocket on the outside for extra cars.
(I don't actually use this pocket very often. I don't have any flat cars like Matchbox cars, so my cars make the mat too bulky.


Another craft for boys that I finished more recently was this set of bean bags.
I used three different colored fabrics in three different boyish fabrics.
For added stability I fused a heavy weight interfacing to the wrong side of each fabric.
These are perfect gifts for boys with mom's who are nursing a new baby or boys who like the throw balls inside or are learning colors!

Wednesday, December 8, 2010

Too Easy Scrabble Tile Magnetic Frame

This is just a little something I made up a few weeks ago, but last night the thought came to me that something similar might make a really nice neighbor gift or something!
So, I will share it now.

I was inspired by this post on Ucreate about a million years ago!
My twist?: I put magnets on the back of the scrabble tiles and used some sheet metal from Home Depot to fill the frame. I could have covered the frame with cute paper, but I liked the industrial look. :)
If I put magnets on the back of more tiles we could write notes to each other or spell other things!

Wednesday, October 13, 2010

Couch Pillows

After much anticipation (here, at our house) we finally have a start to new couch pillows!
Two down. Two to go.


I wanted a scrappy look... I think I got that.


I did the backs like this so I can switch these puppies out as my mood changes... err... maybe not quite that often!

Ta Da!

Another Rag Quilt

This little number was a baby gift. I always try to make something as a gift, and this particular day, I was feeling the need to make a rag quilt!

The fabric was all scraps of flannel I had.
I kind of like the random mismatched squares.

A-Line Skirt

Here are some skirts I made using this super-easy, no pattern tutorial I found here!


2x4 Pumpkins

I saw this tutorial here which linked me to the original post, here! This was a great project for all of our random scraps and cull lumber pieces!

I asked the hubs to cut the wood for me and he came up with two sets that look like this one below... So, I gave one away. haha! 12 pumpkins would have been a little much. He also made the grooves for my with our table saw. Yay for hubbies!

We have 2x4s and 2x6s cut in 8,6, and 4 inch tall pieces.
I went back and cut the 8inch 2x4 one in half and made 2, 4 inch pumpkins and gifted those out as well. As of right now, the 8inch 2x6 is still sitting on my kitchen island. I can't decide if I want a super tall pumpkin, 2 short pumpkins, a white pumpkin, or no more pumpkins.
Oh.. the brain of a crafter.


And here is the finished project!
Well, maybe I need some more raffia. :)

Tuesday, September 28, 2010

An Apron for the Tot

Because Jakey loves to help in the kitchen so much, I decided he needed a tot sized apron to help him dress the part and possibly save his clothes from the inevitable spills.

I used a commercial pattern for a child's apron to get a basic shape and size but ended up modifying it to make the straps adjustable so he can grow into the apron for a while.

Instead of using a separate neck strap and ties, I made them the same piece. That makes the apron adjustable.
I just put a casing in along the side of the apron and then slid in the ties.
The ties can be pulled to shorten the neck strap,
or they can be loosened to make it bigger.

Tot approved.

Monday, September 27, 2010

Getting Ready for Fall

I think every couch should be adorned with candy, don't you?

This idea came from a friend of mine on Facebook, but I can't retrace my steps to link to it. At any rate, I love my new candy corn pillow.

And this:
I saw here.
And then I saw it about a million other places, but I knew when I first saw it that I HAD to make it.
I haven't hung it yet. It still seems a bit early.
I love the extra splash of orange.

Sunday, September 26, 2010

My First Rag Quilt

Wanting to make something homemade for a baby gift, and fast, I dug out all of my "boy" scraps and made this rag quilt.

It is all out of simple cotton prints.
I could have added batting to the individual fabric sandwiches, but I didn't since the baby is a summer baby and will outgrow the blanket before it is cold enough to need it.

Anyway, I thought it was pretty cute and it cost me nothing and took me only about 2-3 hours.
Sweet!

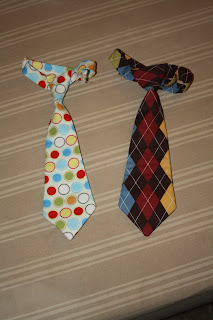
Toddler Tie

Way back for Easter, I made Jake a "Lil Guy Tie" using Ashley at Make it and Love it's pattern.
You can buy the pattern HERE!

We get lots of compliments at church, and I think he looks pretty cute as well.
:)

A New Key Fob

My first attempt at a fabric keychain was a bit rushed and kind of sloppy, so I decided to give it another go and actually follow the tutorial, Here, at The Idea Room.


Here is my second attempt and it looks tons better.
Plus, I used some cute canvas from Hob Lob and it is much sturdier.

You should try one!

Sunday, September 19, 2010

Black Bean Chicken (Slow Cooker)

It has to be said that I don't cook. Like, at all. And while I love to bake, I am not usually one to try something complicated. I like cookies and dessert bars. That is pretty much it.

So, when my friend Tenille decided one day that she was going to get me over my fear of savory foods she gave me this recipe and our little family LOVES it. It is beyond easy. And if your family doesn't make something like it already, you should!

Black Bean Chicken

3-4 Chicken Breasts
1 Can of Black Beans (we drain them)
1 Can of Corn (We don't drain them)
And a Jar of salsa (around 12 oz.)

Cook in slow cooker until the chicken is done. We do ours on low for an average of about 5 hours...

... and it is always Jakey approved.


Sunday, September 12, 2010

Pictures of Baby Camden

My good friend, Melinda, asked me to come take some pictures of her son and these are the results.

I love practicing my photography.
I am getting faster at Manual and better at knowing what settings will give me the look I want.
I used my 50mm fixed lens for all of these pictures and they were all shot in Camden's nursery. We took some with him on his dresser, and some with a piece of fabric draped over the rail of his crib and his dad kneeling on the floor.


Camden was wide awake for this whole shoot.
I was expecting a sleeping baby, especially because he is only two weeks old.


I like these backlit window shots even if Melinda wasn't excited to be photographed 2 weeks postpartum and at 8am in the morning. ;)

Sunday, August 29, 2010

The Magnet Board and Basketball Hoop

We used the space under the window for another Children's Museum of Phoenix inspired play area.

Introducing!:

The Magnet Board
It has lots of pvc pipe tubes and elbows to use to make a ball run as well as just some fun magnets to play with.

Jake posed for this picture.
He is so funny sometimes.

And, in one corner we moved our basketball hoop (that was in our family room) up to the playroom.
We found the giant tubs at Bashas when we found the noodles for the noodle forest. It was a good night to stop at Bashas for some milk!
They were $4.50 and matched the colors so great.
One has balls and the other has vehicles.

Well, there you have it. Our playroom.
Let me know if you would like any different pictures or information on any specific project!

Sunday, August 22, 2010

A Noodle Forest

Have you ever been to the Children's Museum of Phoenix?
Well, they have this awesome noodle forest and the first time I saw it I was already trying to figure out how to replicate it (in miniature).

Well, here you have it!

The whole family hanging our contraption.

I should probably mention now that this picture below is taken from the door. To the immediate right is The Tree and Mailbox. And to the left is a short wall with a mirror hanging on it, and then as you turn the corner, that is the closet.
In this picture you can see the whole top side of the "Noodle Wall" with the Super Simple Wall Hangings above and also a little bit of how we hung the thing.
And, in case you were wondering about the paint colors since they always seem to be changing - we have two walls that are green (the North and East) and two walls that are Orange (The South and West). It actually looks pretty cool, and was completely determined by what colors of "Ooops" paint we could get our hands on. :)


Want some details?:
We found pool noodles at Bashas for $.65 and that was by far the cheapest we saw including buying in bulk online. We have mostly those, but then had to break down and buy some Dollar Tree ones to finish the project. (Those are the shorter yellow ones.) There are a total of 34 noodles making this the most expensive playroom project by far.

We attached the noodles to some 2' by 4' peg board with some nylon rope that we strung through the noodles and the holes in the pegboard, tied in a knot and then burned the ends. We had to drill the holes in the pegboard a bit larger to accommodate the rope we used.

The peg board is attached to the roof with eyebolt screws. We were lucky to find some rafters in good positioning. There are also six eyebolt bolts in the pegboard. We started with the rope only on the ends, but then added the center support when we noticed a definite sag in the pegboard.

That's it. The hardest part was finding noodles!
Oh well. We are officially the coolest parents ever.